Configuring iTerm2 for mosh: URLs
I use a Mac as my main typing/character-displaying computer, and on
macOS, iTerm2 is the best terminal emulator that I’ve found so
far. In addition to iTerm2, I also use mosh,
the mobile shell, to get a fast, interactive and
disconnection-resistant SSH-like connection to hosts on which I need
to use the commandline.
So, in order to make getting to these hosts fast, I’ve made something
that sets up bookmarks which open a new terminal window for me: The ruby
gem ssh_bookmarker runs
in a LaunchAgent anytime my ~/.ssh/known_hosts or ~/.ssh/config
files change and drops a bunch of bookmarks in a directory that gets
indexed by spotlight.
Now, whenever I want to open a remote shell, I use spotlight and type
the host name. Very handy! (You can also use open ssh://my.cool.server.horse and get a new iTerm tab with the SSH
session in it, and that’s exactly what goes on in the background.)
That works perfectly for SSH (to see how to set this up, see
the FAQ and search for “handler for
ssh://”), but I’d like to do this with mosh or other custom URL
schemes, too! This is not as readily available as ssh:// URL
handling, but it can be done.
For about 5 years now, I’ve had to look up how to do this and cobble together a solution from various rumors, stackoverflow articles and digging through source code. No more! This time I’m blogging the solution so future-me can have an easier time of it.
Prerequisites
First, you’ll need iTerm2 - I use version 3.0.12, but the newer the
better. Then, you’ll need mosh - I install it from homebrew, and the
program location is /usr/local/bin/mosh.
Throughout this post, we’ll also be using the jq and duti tools,
you can get them from homebrew, too.
The iTerm profile and its GUID
First, you’ll need an iTerm profile dedicated to mosh-ing. Any
settings you want are ok, but you need to set this as the command:
/usr/local/bin/mosh $$HOST$$
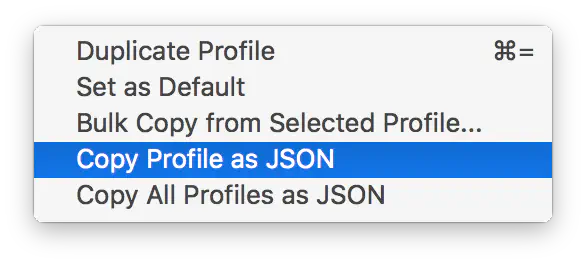
Now that you have this profile, you’ll need its GUID. This is easiest by exporting your new profile as JSON from iTerm’s Profiles preferences:
- Select the Mosh profile you just created,
- Open the “Other Actions” gear menu below the profile list.
- Select “Copy Profile as JSON”:

To figure out the profile’s GUID, run:
pbpaste | jq '.Guid'
This should print a UUID in double quotes. Make a note of that string!
We’re going to use it as THEGUID below.
URL handling - LaunchServices
URL handling in macOS comes in two steps:
First when you run open somescheme://host/,
LaunchServices looks
up what program handles the given URL scheme. To set iTerm2 up as the
handler for mosh:// URLs, I use duti:
duti -s com.googlecode.iterm2 mosh
At this point, running open mosh://my.cool.server.horse should open
a new iTerm tab, but it won’t open a mosh connection yet. What else do
we need to do?
URL handling on iTerm’s end
Once iTerm gets instructed to open a mosh:// URL, it looks up the
URL scheme in its scheme<>profile mapping. Since mosh is not in
there yet, let’s fix this (replace THEGUID with the output from jq
in the GUID section:
defaults write com.googlecode.iterm2 URLHandlersByGuid -dict-add mosh THEGUID
And then restart iTerm2.
Success
If all this worked correctly and all the IDs line up, running open mosh://my.cool.server.horse should open a new iTerm window running
mosh, attempting to open a connection to a cool example server.
Next steps
You can save yourself the trouble of keeping track of these GUIDs, especially if you use some sort of management tool (like ansible) to automatically set up your Macs. I have started experimenting with Dynamic Profiles and specifying GUIDs as host names, and that might have some pleasing results, too. I’ll post an update when I get this fully working.
Also, this doesn’t yet work for mosh:// URLs with a user name
specified (or rather, the user name gets ignored and only the host
part gets passed to mosh). It’s likely that you’ll have to wrap the
mosh tool with another tool in order to get that to work.
In the meantime, I hope you enjoy.